Hi, everyone. I just finished painting one of my
Sarissa Precision 28mm CityBlock buildings. I got the bundle deal of 6 buildings as a Christmas present and finally painted the first one. I had a good suggestion for painting it over on Lead Adventures forum from tjantzen in this thread. He was smart enough to spraypaint his before assembly. Mine are already assembled and wood-glued so now I have to paint them assembled. It would have been a lot faster and more cleanly detailed if I had spraypainted them prior to assembly. So if you've got some SP buildings that haven't been built yet, please consider spraypainting them first. Okay, Public Service Announcement over, on to our regularly scheduled post. :)
I was worried that spray paint might obscure the very nice detail on the building, or cause the mdf to warp. Especially since I think they look pretty damn good even unpainted. I may leave one unpainted, but I didn't want 6 unpainted buildings all the exact same color on the table. Plus, I recently spray painted an MDF GameCraft Minis Old West building and it was fine with spray paint. So, it turns out is the SP building.
I used Krylon Ruddy Brown Indoor/Outdoor Primer and it worked great. No warping, no obscuration of detail. As an added lucky coincidence, I had some Americana "Traditional Burnt Sienna" acrylic craft paint, which is almost a perfect match color wise to Krylon Ruddy Brown primer.
I used another Americana acrylic craft paint for the trim on the ledges, "Buttermilk" and Americana "Slate Gray" for the sidewalk. The windows were painted with Citadel Boltgun Metal. The two minis are a Studio Miniatures Zombie and a Haloclix. I think the SP buildings are very well sized for 28mm.
Pic above shows the side door with minis for scale and dramatic accent. :)
This is the back of the building. I will probably add signage and I still need to do some weathering.
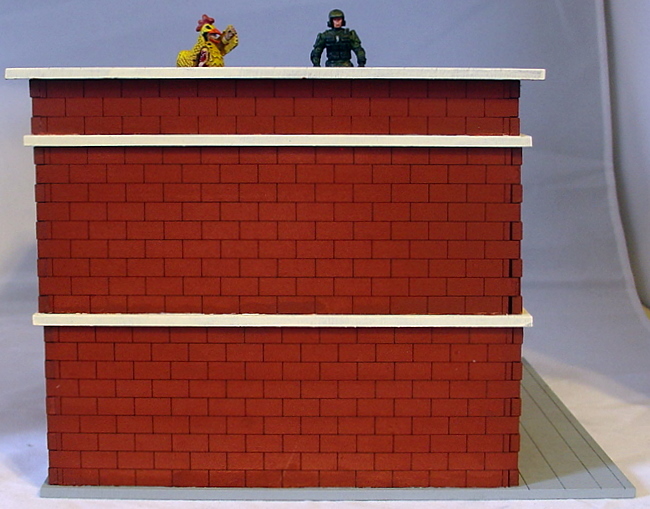
Pic above shows the other side of the building, with minis placed on the roof. The parapet comes to the perfect height.

Pic above shows the interior of the ground floor from the front. I used printouts from the WorldWorks Games "Bank" set for the walls, floor and stairs. I still need furniture and can't decide whether to use paper from the Bank set, or to splurge on some of the nice resin stuff out there. Paper will be free since I already have set, but it takes me a long time to make the paper stuff, lots of fiddly cutting, folding and edging. And I usually end up with less than stellar results. Resin will cost lots more, but is definitely easier and more durable. I debated adding a real stairway instead of the paper perspective one. That would necessitate cutting a hole in the floor of the next story, and I know I can't get laser precision cuts, so for now, I'll go with the paper. That's a suggestion I'll make to Sarissa Precision, perhaps make some floor versions with cut-outs for stairs.

Pic above shows the interior from another angle. I think using the WWG paper printouts for texture is a very nice option with these buildings.
Pic above shows another angle of the ground floor, featuring the excellent windows and doors. I considered adding blisterpack plastic for "glass" in the windows, but I just like being able to have minis point guns out windows, so opted to just leave them open. I may add glass on a later model just to see if I like it.
Here's a perspective shot through the front doors and windows.
Another shot through the windows upstairs.
Here's a view of the upstairs interior. I just used a carpet texture form the WWG Bank for the floor and another perspective view stairs. The stair cut-out was mounted on mattboard and is held in place with double-sided repositionable tape. The carpet is held in place with non-removable double-sided tape. I decided to just leave the walls plain, and just went back over the Ruddy Brown primer with the Burnt Sienna craft paint. I may go back and add wallpaper at some time, but I figured this floor would be more utilitarian than the main floor.
Pic above shows the rooftop. I may go back and add some roof detail, or use some Litko Cornice Braces under the overhang of the railing, but it works pretty well now. That could be another suggestion for Sarissa Precision; please make some rooftop stuff, like stair access sheds, billboards and such.

Here's a shot of the painted building in place on the cityboard. Next to it is another SP building, one of the three #64 buildings you get in the bundle. If you notice, that 64 has 3 stories. All of the buildings in the bundle are 2 stories tall, however, if you want more variety in height, you can simply pull one of the floors from 1 building and add it to another. With this configuration, instead of 3 two story #64s, I now have one each of a 1story, 2 story and 3 story #64. I like this ability to make different vertical sized buildings. Plus, Sarissa allows you to purchase additional floors when you buy a building. I wonder if they allow you to just purchase additional floors in a subsequent order. I don't see a way to do it on their website.
Last pic (above) shows one of the back lots with the painted SP building in place, street furnishings, and a Proxie Models Billboard on the rooftop.
Well, that's all for now. I'm really pleased with these Sarissa Precision buildings. My fears about warping and obscuring detail if I painted them have been laid to rest. They take paint well and there's no loss of detail at all. However, I should add, if a little heavy overspray does occur and you accidentally fill in the lines between stones, you can just scrape out the overspray with a tooth pick or craft knife.


16 comments:
Looks good. Cracking interiors.
An Excellent building and very well painted too!
Nice building...and the chicken guy is a crack-up!
Great paint job! :) I can't wait to see the rest.
Very nice, especially the interior!
The inside is pretty excellent. Great model to play.
Paint job is top rate Joe, and I love !!! the interior, looks so good, keep up the standard mate.
This has turned out darned good. Very nicely painted and the interiors look very smart. Keep up the good work, Joe. You're on a winning streak, my friend!
The interiors are brilliant and of course the building....
Excellent mate nice job on the interior and exterior top stuff sir!
Wow, thanks, everyone. I appreciate your kindness and encouragement.
@Dangerous Brian: Thanks, very much. I'm going to use more of the WorldWorks textures for the interiors coming up.
@Ray: I wish I had spraypainted the parts before assembly. It would ahve gone together much faster from a painting standpoint. I kept going over the model and touching up where I got white on the red, then I'd get red on the white, ad nauseum. Finally I gave up and left well enough alone. :)
@Jay: Thanks. I really like that chicken guy, too. Just a really cool scuplt.
@Bragondorn: Thanks. Now I'm looking forward to painting them, too. Now that I know the paint won't hurt them.
@brutPaul: Thanks. The WWG texture really made it easy.
@Dr. WIllett's Workshop. Thanks very much. The design of the model is nice and open, with easy access to the interior, so I wanted the interior to be as nice as the outside.
@The Extraordinarii: Thanks. I think if I keep using the WWG textures I should be okay.
@Vampifan: Thanks very much. I don't know if it shows up too well, but I took a page out of your book doing the vertical columns on the wall. I added an extra layer of cardstock on those to try and give them some more depth. It may be too subtle with just cardstock. Next time I'll put the print-out onto a strip of mattboard for more depth, I think.
@Fran: Thanks very much. I'm glad everyone is liking the interiors. The exteriors are so nice it really gave me a challenge to try to keep up. :)
@Brummie: Thanks very much. You guys are really geting me stoked to start on anothe building ASAP.
eally good, I love the way they work together on the game board.
@Irqan: Thanks very much. That is one of the things I really like about the Sarissa Precision models, they are different but look very cohesive on the table.
Excellent paint job, makes me much more inclined to paint mine now as I've been putting it off for more than six months now. I'm also inclined to get the street deal and the warehouse too.
Many thanks Lucky Joe, great blog post
@zabadak: Thanks very much. I'm glad if the post was at all helpful. Check out my thread on Lead Adventure forum. TJantzen posted a pic of what happened to his SP building after he did a wash. Not too good result, though I'm sure he'll be able to fix it. It's down toward the bottom of the page.
http://www.lead-adventure.de/index.php?topic=36985.0
Fantastic Joe, love what yu've done with that!
Post a Comment